
 |
| Prague, Czech Republic |
NOTE: The text below are based on my personal experiences only. I’m neither connected with any travel agency nor any embassy. Also, the requirements and steps I listed are meant for short-stay Schengen tourist visa ONLY. For questions on other visa types such as spouse visa, work visa, and student visa, this blog entry may not be able to directly answer them, and it’s best to inquire at the embassy or application center.
What is Schengen
The term “Schengen” is actually a town name in Europe (in Schengen, Luxembourg) where the Schengen Agreement was signed in 1985. In the said agreement, several countries united to create a “borderless area” for the purpose of easy travel, which means going from one member country to the other is like on a domestic or local travel. Consequently, a single jurisdiction and common visa policy happen among these member countries within the Schengen area. |
| Vienna, Austria |
While the Schengen visa is hugely connected with Europe, NOT ALL European countries are part of the Schengen Agreement. There’s a total of 44 countries in Europe, 26 of which are Schengen member countries, namely:
1. Austria
2. Belgium
3. Czech Republic
4. Denmark
5. Estonia
6. Finland
7. France
8. Germany
9. Greece
10. Hungary
11. Iceland
12. Italy
13. Latvia
14. Liechtenstein
15. Lithuania
16. Luxembourg
17. Malta
18. Netherlands
19. Norway
20. Poland
21. Portugal
22. Slovakia
23. Slovenia
24. Spain
25. Sweden
26. Switzerland
If you wish to visit one or several countries in the list above and it's for the purpose of leisure / tourism / short visit, then you have to apply a Schengen tourist visa. For non-European Union (EU) passport holders, such as the Philippines, there's a need to get a Schengen visa.
 |
| Sample Schengen visa issued by the French Embassy |
What's a short-stay Schengen visa
There are different types of Schengen visas, but I'd only like to focus on one. Labeled as visa type "C," a short-stay visa can provide a 90-day maximum duration of stay in the Schengen area. But of course, the number of days that will be granted to you depends on what you request. It doesn't mean that if you requested for 10 days, you may stay there for 90 days. In some cases, however, they follow some sort of "bracket" in terms of providing the number of days. For example, if you requested for 10 days, they could give you 15 days (or more). Once granted, the visa is valid 30 days from its validity start date.Where to apply the Schengen visa
The Schengen visa is requested from the embassy (or consulate), which is often represented by a third-party agency that accepts and processes tourist visa applications. This means that instead of going to the embassy's office, you head to the agency instead. The French Embassy in Manila, for example, gets the services of VFS Global. Note: There’s also VFS Global for UK, Norway, Australia, etc. in Manila with their respective office locations. Do not get them confused with the VFS Global France, which is located in Makati City (full address is below). |
| Granada, Spain |
- If you’ll visit ONE member country only, request from its embassy. For example, if you plan to go to Spain for 10 days, then apply at the Spanish Consulate.
- If you’ll visit MULTIPLE member countries, you request from where you’ll stay the longest. For example, if you plan to be in France for 5 days, Belgium in 3 days, and Switzerland in 2 days, then apply at the French Embassy.
- In case of equal number of days per member country, request from where you’ll first enter or start your trip. For example, if your itinerary is Germany first for 3 days, then Poland for 3 days, and lastly Luxembourg for 3 days, then apply at the German Embassy.
Single vs. multiple entry
If you intend to stay within the Schengen area for the entire trip only, then apply for single entry. Otherwise, apply for multiple entry. For example, if your itinerary is Spain-Andorra-Spain, you must apply a multiple entry visa since Andorra isn't part of Schengen area and you need to re-enter Spain.What are the requirements
Even if the member countries are said to have a common visa policy, the visa requirements vary per embassy. Some ask for more documents, some do not. Thus, it's best to check the embassy’s website for the requirements.
For now, I can only speak of what the French Embassy required from me. The list below are the documents I submitted:
 |
| Paris, France |
For now, I can only speak of what the French Embassy required from me. The list below are the documents I submitted:
1. Valid passport: Make sure the passport is valid for at least 6 months upon the return date of intended travel. It must also have at least 2 blank pages.
2. Application form: The form is filled up online and has to be printed. Make sure to complete all fields and put N/A if an item isn’t applicable to you.
3. Passport-size photo: It must be taken in the last 6 months with white background. If you aren’t sure of the size, when you have your photo taken at the shop, just inform them it’s for Schengen visa application.
4. Proof of financial means
Bank statement and bank certificate: FYI, they’re different from each other. A bank statement shows the cash flow (i.e. debit and credit) in your account. For Schengen visa, it’s usually required to present a 6-month bank statement. Meanwhile, a bank certificate is a proof of the account’s existence. You can request these at the branch of your account. It costs P100-200 and may take one business day to get processed.
In my case, I submitted bank statement and bank certificate of 2 bank accounts. One is a payroll account where I withdraw money more often (so there’s less money in it), and the other is a savings account where there’s bigger amount.
So how much money should be in the account? Again, it depends on your itinerary. Just make sure the amount can finance all your expenses while in Schengen area. As estimate, Europe travel costs 60€-100€ per day, inclusive of food, accommodation, transportation, and other expenses.
 |
| Kehl, Germany |
5. Proof of employment
Certificate of employment (COE): Since I’m an employee, I requested a COE from my company’s HR. For self-employed, business permits and other proofs of business ownership may be submitted.
Income Tax Return (ITR): I requested this from my company’s HR too. But you may also get this from Bureau of Internal Revenue (BIR).
6. Travel insurance: As a general requirement by Schengen countries, the insurance should have a coverage of at least 30,000€ that will cover your entire stay within the Schengen area.
I often get Pacific Cross as my travel insurance, and the exact plan for Schengen visa is called Euro Prestige Plan. What’s good is that in case of visa denial, the insurance may be refunded by 80%. The price of the insurance depends on the number of days of coverage. You can either purchase it online or go to their head office in Makati (open even on Saturdays).
7. Travel itinerary: I use a table when creating a travel itinerary so that it's easier to view and understand. Here’s an example:


8. Proof of accommodation: I presented hotel reservations done via booking.com. What’s good is that most accommodations at booking.com don’t charge an amount right away for reserving and you only pay when you’re at the hotel. Meanwhile, in case you have a sponsor, you may present an invitation letter and documents to prove his/her residency in that country.
9. Return flight reservations: Note that it isn’t advised to buy the plane ticket right away because you’ll never know if your visa gets approved or not. Some take this risk when they score an airline promo. To be on the safe side though, you can go to any travel agency to reserve flights. As for me, I reserve flights myself. It costs me an amount too, but is way cheaper than get travel agency services to hold a flight reservation. Airlines such as Emirates, Cathay Pacific, etc. have this flight reservation option. The amount you pay gets waived when you push through with purchasing the tickets.
10. Cover letter: A cover letter is a letter of intent that provides your purpose of travel, duration of travel, departure and arrival dates, and countries to be visited. For me, a cover letter should be short, specific, and direct to the point. It isn't a major requirement, but creating one is a plus.
11. Other supporting proof of identity: I gave an NSO-issued (original) birth certificate. Note that once you submit original documents, they won’t be returned to you anymore.
To sum it up, for me the intention of presenting these documents is to:
To sum it up, for me the intention of presenting these documents is to:
- Prove your strong ties with your home country. Meaning, you don't intend to overstay or work illegally in the Schengen area
- Prove that the only purpose is tourism
- Prove you're financially capable and covered by insurance to travel. Meaning, you won't be a burden to that country in case emergencies happen.
What to do before the appointment day
- Complete all the requirements. To be organized, I put them all in a long brown envelope, with the documents sorted by: original, photocopied, and extra copies.

- Register an account at France-Visas. Its purpose is to create you an application and to fill up the application form online. Note that it will ask you to verify the account via email, so make sure you use an active email address.
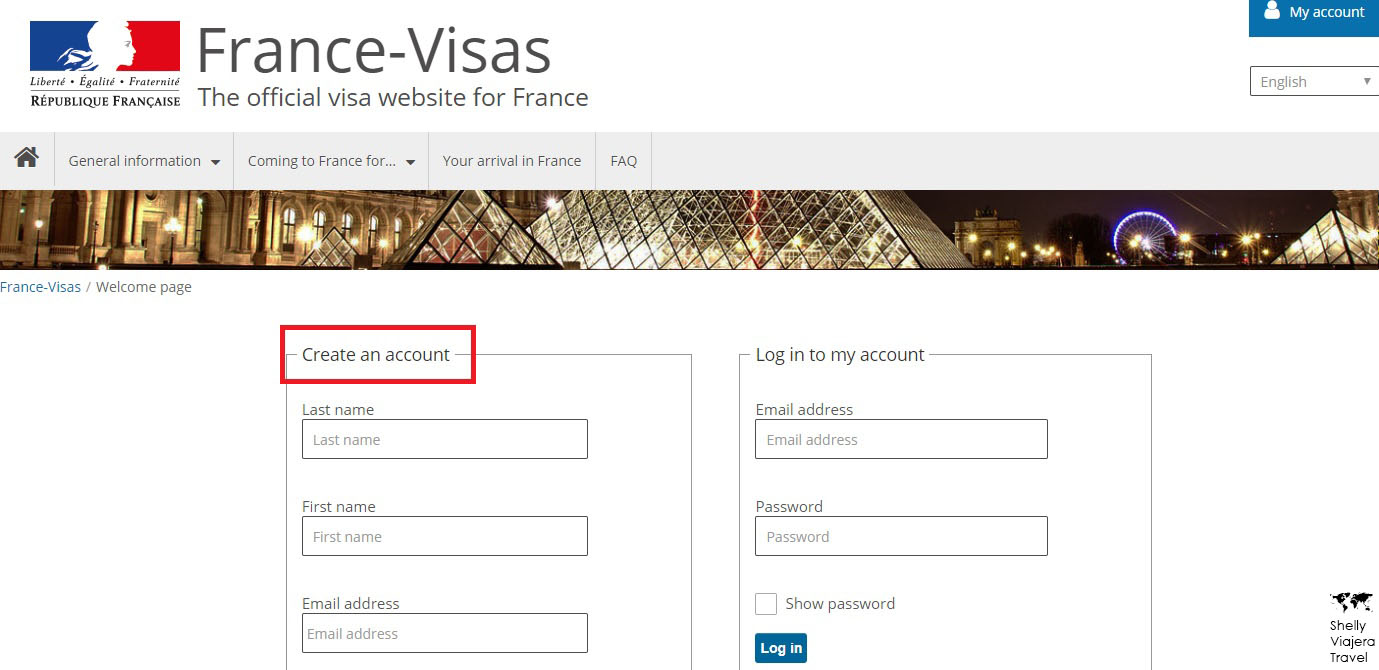
- At the France-Visas’ website, fill up the application form. It's divided into 6 pages, namely: Your travel plan, Your personal information, Your previous visas, Your stay, Your contacts, and Recap. They're pretty much self-explanatory. Just make sure you fill up all correctly and in case an item isn't applicable, put N/A.

- Once submitted, you’ll be given a checklist. Print this along with the application form and bring it on the appointment day.
- Next, go to VFS Global's website. Click "New User?" to register an account. It will ask you to verify the account via email, so make sure you use an active email address. Note: This is a different account from France-Visas. It's meant to book an appointment with VFS Global where you'll submit the requirements.

- Select your preferred date. The date is marked green when available, red if not. Then, select your preferred time. Application is Mondays-Fridays, 7AM to 2PM. Once done, it will issue a visa appointment letter. Print this and bring it on the application day. Note: You can set an appointment as early as 3 months and as late as 5 days before intended travel date. To be on the safe side, I'd say book 1 month before the intended travel date.
What to do during the appointment day
- Go to VFS Global office on your appointment day. Physical appearance of all applicants is required. Be at least 15 minutes early.
- Sign up at the reception. Bags are not allowed inside, so if you have a non-applicant companion, better leave your bags with them downstairs. Otherwise, you can make use of the lockers (for a fee).
- A queue number will be assigned per applicant. Once called, submit your requirements at the designated counter. In this step, your passport will also be collected, so just be sure you don’t have any upcoming international travels.
- You’ll be called again to enter a small room for your photo and biometrics to be taken.

Devin, Slovakia - Next, the staff will ask basic questions such as your name, birth date, etc. Also, you need to double check the spelling of your name on the computer.
- Pay the non-refundable 60€ visa fee (converted into Philippine peso), plus the agency's fee.
- In case you prefer the passport to be given back to you via delivery, you need to pay P330 for the courier fee. Make sure you place the correct name, address, and contact numbers. If you want to personally claim the passport, you’ll be notified via SMS or you can monitor the application online. The passport collection schedule is Mondays-Fridays, 2PM to 4PM.
- Lastly, just wait and pray :) With my experience, during the first application, it took more than 10 business days before I got my passport back. However, in the succeeding applications, it only took 2 business days.
VFS Global France
30th Floor, The World Centre, Senator Gil Puyat Avenue, Makati City
info.frph@vfsglobal.com
info.frph@vfsglobal.com
+63 2 7904903
Have you applied a Schengen visa before? What experiences can you share?
Travel Europe: How to Apply for a Short-Stay Schengen Tourist Visa in the Philippines
 Reviewed by Shelly Viajera Travel
on
11.11.19
Rating:
Reviewed by Shelly Viajera Travel
on
11.11.19
Rating:
Reviewed by Shelly Viajera Travel
on
11.11.19
Rating:


No comments:
I want to hear from you! Please leave your comment! (: